The Floor Trader Trading System
By Galen Woods ‐ 9 min read
The Floor Trader System is a solid retracement strategy that works with simple price action trading concepts. Find detailed trading rules and examples here.
The Floor Trader Trading System is an interesting retracement strategy discussed on the defunct website Trading-Naked. It employs a simple recipe. First, it uses two moving averages to determine the trend. Then, it takes advantage of a price pullback to enter the market.
But don’t let its simplicity deceive you; there are subtle factors you need to take note of for it to be effective. More on that later.
Now, let’s introduce the trading rules.
Note: I’ve interpreted the source material with my observations to form the trading rules below. Hence, there are slight differences.
Trend Identification Rules
Trading approaches tend to focus on when to get into the market. But the best strategies also highlight when to stay out of the market.
This aspect is a crucial strength of the Floor Trader Trading System. It allows you to consider a trade only if a stable trend is in place. This trait is critical for any sensible retracement strategy.
Hence, the first step is to determine the trend.
Before you proceed, place two simple moving averages (SMA) on your charts:
- 9-period SMA
- 18-period SMA
Identifying an Uptrend Cycle
An uptrend cycle is a prerequisite for a bullish setup.
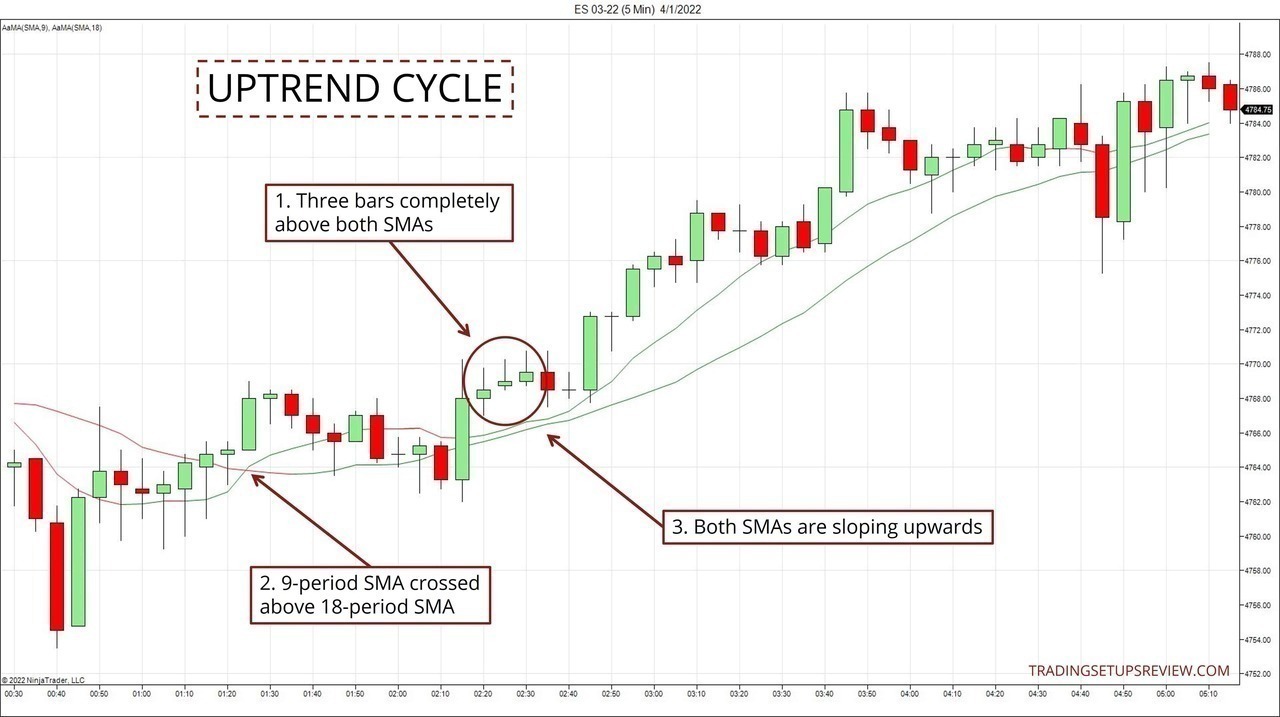
To confirm a bullish trend, look for the following criteria:
- Price trading above both SMAs for at least three consecutive bars.
- The 9-period SMA should be above the 18-period SMA.
- Both SMAs should be sloping up.
Identifying a Downtrend Cycle
A downtrend cycle sets the stage for taking short setups. The chart below shows an example.

To confirm a bearish trend, look for the following criteria:
- Price trading below both SMAs for at least three consecutive bars.
- The 9-period SMA should be below the 18-period SMA.
- Both SMAs should be sloping down.
Many traders focus on trading indicators and their associated rules, missing the information price action offers. The first rule covered above ensures that we keep an eye on price action despite using moving averages.
It’s worth bearing in mind that the trend identification rules above define the start of an uptrend or downtrend. It speaks nothing to when the trend ends, although the same factors are relevant. So this is an area that you need to pay attention to.
Trade Entry Rules
There are three entry levels. As you will see, each level corresponds to a different degree of pullback.
Level 1 is the most conservative entry, and Level 3 is the most aggressive.
Long Entry Rules
First, the market must be in an uptrend cycle.
Then, you have three options:
- Level 1 - Buy with a higher bar high after the price retraces down to the 18-period SMA.
- Level 2 - Buy with a higher bar high after the price retraces down to the 9-period SMA.
- Level 3 - Buy with a higher bar high after the price retraces down without touching any of the SMAs.
What does “price retraces” mean? What do we need to see to know that the market has retraced?
Here, we will look for a bar with a lower low and lower high compared to the previous bar. (Note for course students: It refers to a down bar.)
In practice, the entry is done by placing and trailing a buy stop order appropriately. The chart below demonstrates how.
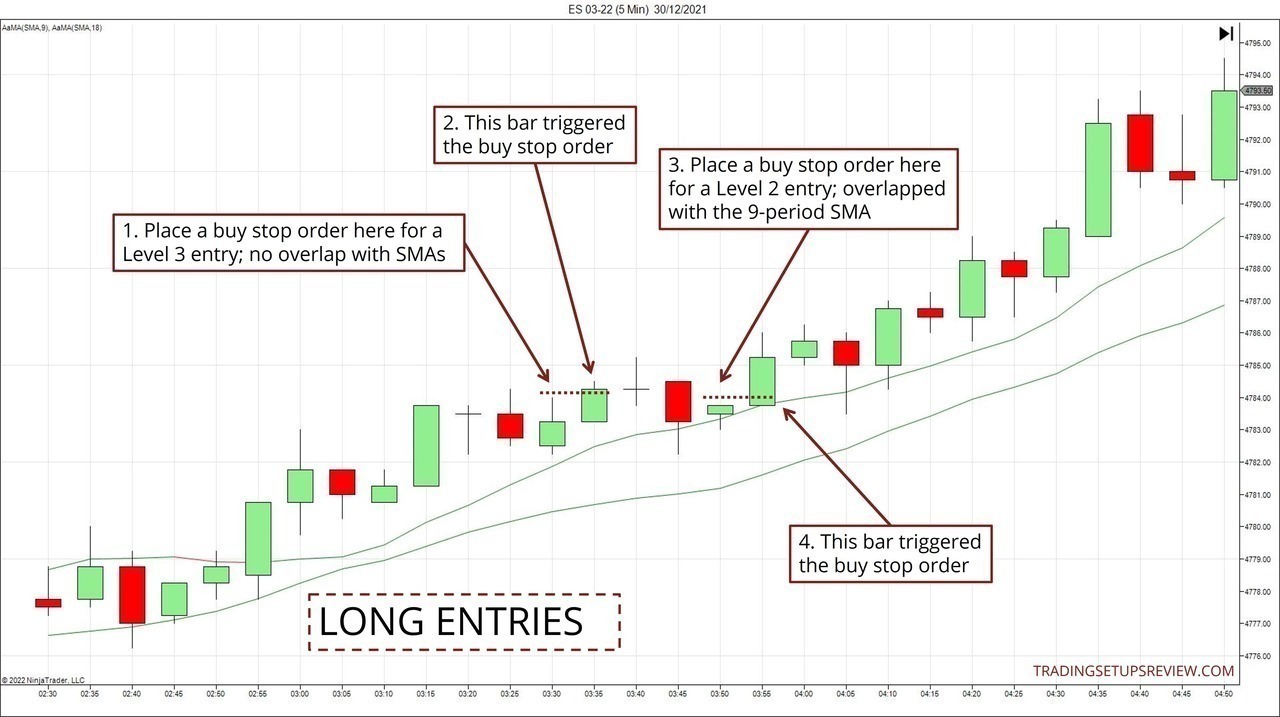
- Place a buy stop order here to target a Level 3 entry.
- This bar pushed higher than the previous bar and triggered the buy order.
- This setup bar overlapped with the 9-period SMA. Hence, it offered a Level 2 entry. Placing a buy stop order above its high gave us a chance to take this Level 2 entry. (If you were aiming for a Level 1 entry, you would hold back the order.)
- This bar triggered the Level 2 entry order.
Short Entry Rules
The market must be in a downtrend cycle.
Then, consider one of the following entry options:
- Level 1 - Sell with a lower bar low after the price retraces to the 18-period SMA.
- Level 2 - Sell with a lower bar low after the price retraces to the 9-period SMA.
- Level 3 - Sell with a lower bar low after the price retraces without touching the SMAs at all.
What does “price retraces” mean?
Here, we look for a bar with a higher high and higher low compared to the previous bar. (Note for course students: It refers to an up bar.)
The chart below points out Level 1 and Level 2 short entries.
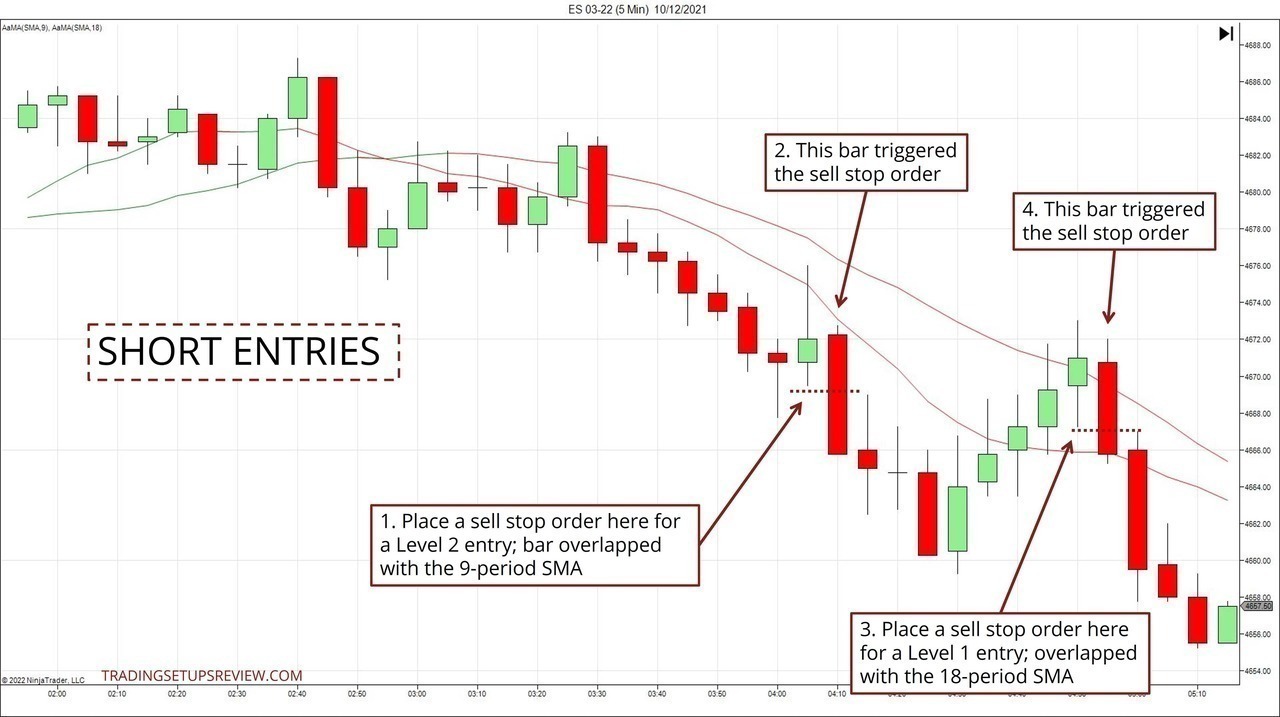
- This pullback bar overlapped with the 9-period SMA. Place a sell stop order here for a Level 2 entry.
- This bar triggered the sell stop order.
- We had to trail the sell stop order upwards for this pullback as no bar made a lower low until this point. Eventually, the market reached the 18-period SMA and offered a Level 1 entry.
- Finally, this bar pushed lower and triggered the sell stop order.
Choice of Entry Level
Which level is the best?
- Aiming for a conservative entry (Level 1) gets in at a better price but risks missing the opportunity altogether.
- Using an aggressive entry (Level 3) gets you into the market more often, but your entry price suffers.
The best option depends on your assessment of the trend. E.g., if you expect an urgent and fast-moving trend, consider an aggressive entry. Also, your stop-loss strategy will play a role.
Floor Trader Trading System Examples
This section will cover two examples from the futures market (ES 5-min).
You can and should certainly apply it to other markets to study this approach yourself.
Winning Example
This example shows a series of potential entries that conform to the trading rules above.
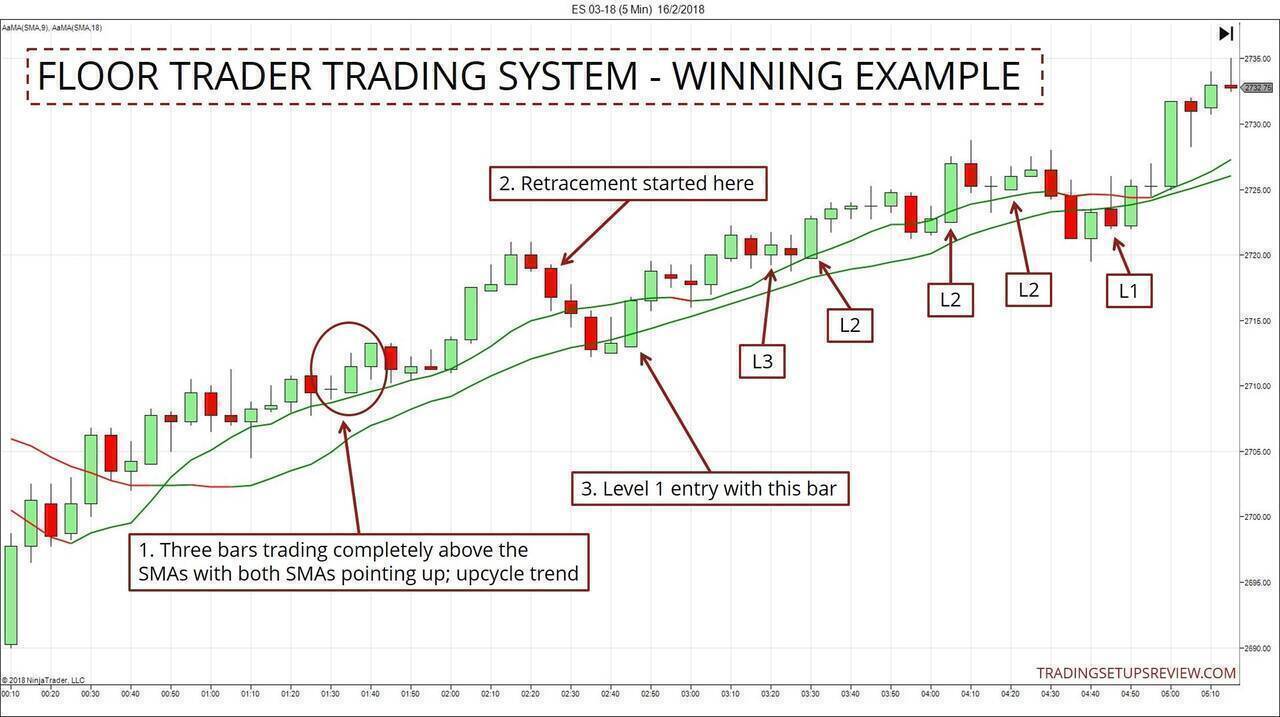
- Three consecutive bars above both SMAs. Although these bars were barely above the 9-period SMA, you can see that the market has started rising many bars ago.
- This bar confirmed a pullback, and we waited for an entry opportunity. We would have placed a buy stop order and trailed it lower with each new bar high.
- Finally, this bar broke the high of the previous bar and triggered the buy stop order. It was a Level 1 entry as the setup bar overlapped with the 18-period SMA.
For this setup, if we were aiming for a Level 1 entry, we would have waited and placed a buy stop order only when the market reached the 18-period SMA.
But if we were okay with taking a Level 3 entry, we would have begun trailing a buy stop order right after the retracement bar (pointed out in #2) formed.
Take a look at the Floor Trader entries of different levels that follow. (Marked according to their levels.)
Not all setups were successful. Pay attention to the difference between the conservative (L1) and aggressive (L3) entries.
Finally, examine the last Level 1 entry, which formed when the 9-period SMA has sloped down. While it was immature to conclude that the bullish trend had ended, this slope change implied that the trend was slowing down.
Losing Example
In a persistent trend, most setups will work out well. So for a rounded view, it’s essential to study how the strategy fails.
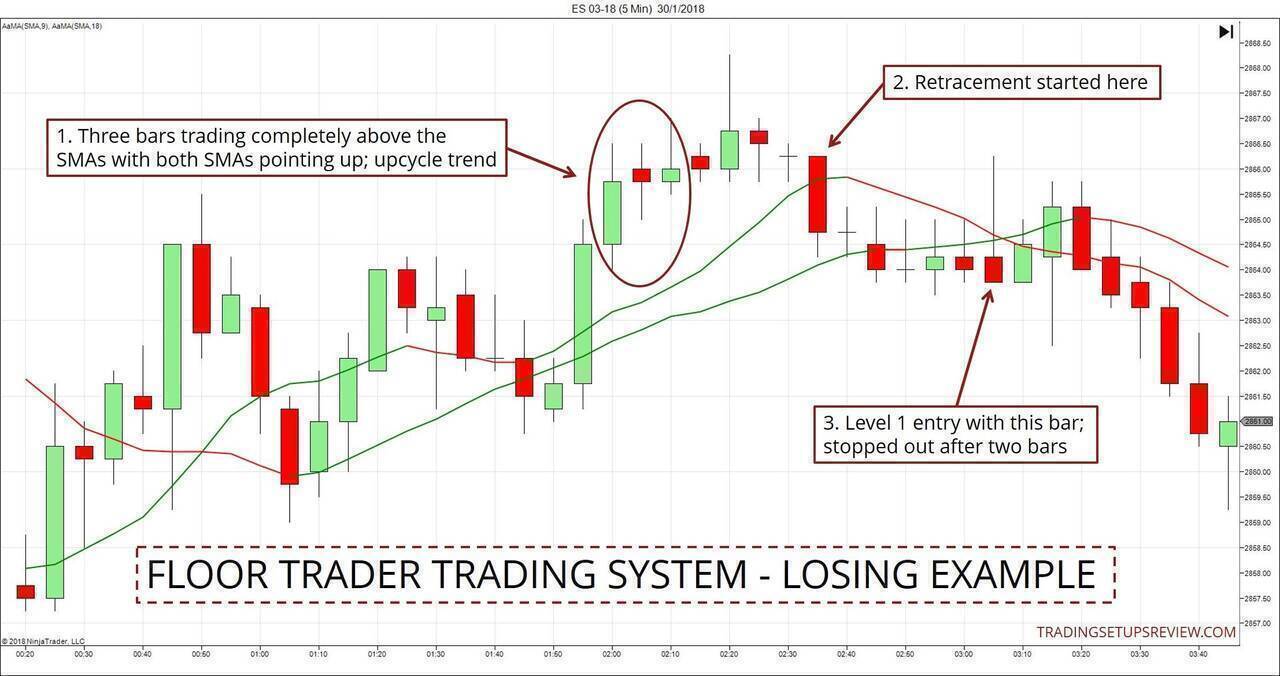
- These three bars formed at a healthy distance above the two SMAs, confirming an uptrend cycle.
- This bar confirmed a retracement down to the SMA. From here, we could trail a buy stop order with each new bar high.
- The retracement went down to test the 18-period SMA and presented a Level 1 entry. This bar rose above the previous bar and triggered the buy stop order. However, the setup failed almost immediately.
There were two warning signs in this example.
- The 9-period SMA sloped down during the retracement. (Just like the last entry in the first example.) This is not a deal-breaker but demands caution.
- The pullback action became congested (look at the series of Dojis preceding our entry) and hence more unpredictable.
Tips and Exceptions - The Floor Trader Trading System
As you explore this system, you will find that the Floor Trader System is a solid and flexible trading approach. You will also notice ways to improve its performance by integrating your trading experience.
In this section, you’ll find some observations that might help you refine this system.
Please familiarize yourself with the basic strategy above before going through this section. If not, you might get overwhelmed.
The tips and exceptions below are explained in the context of a bullish setup.
Trading Tips
These tips will help you focus on the best trades:
- Take Level 3 entries only in the early part of a healthy and robust trend.
- Ideally, the slopes of the two SMAs should stay positive during the retracement.
- A smooth and orderly retracement is preferred. (Like the one shown in the winning example.)
- The ideal pullback should last between two to five price bars.
- Bar range should stay constant or decrease during a retracement.
- Stop looking for entries if a bar forms entirely below the 18-period SMA.
- Use bar patterns to filter entries.
Exceptions
If you are very confident of your market bias analysis, here are exceptions you can make at your discretion:
- The 9-period SMA does not have to be above the 18-period SMA. So it’s acceptable if the 9-period SMA is about to cross above.
- To identify a new uptrend cycle, you don’t need both SMAs to slope up. One SMA sloping up is enough.
- Price does not have to trade above the two SMAs for three consecutive bars. You can proceed if the market is trading high above the two SMAs.
Conclusion - Floor Trader System
I like the Floor Trader System for a few reasons.
First, it relates strongly to price action. It focuses on the behavior of price and its relationship to the SMAs. It’s not a strategy that blindly follows signals from trading indicators.
Second, it offers three levels of entries. This design is excellent for the education of a new trader. It recognizes that there are different levels of setups possible with every strategy.
The possible entries range from the most conservative to the most aggressive, representing a vital decision layer in the trading strategy.
Third, although this trading system prescribes a set of trading rules, it allows for discretion. You can see this from the exceptions and extra considerations in the previous section.
Ultimately, what matters most is what you observe in the markets and not what other traders claim.
To experiment further with this system, here are some ideas:
- Try it on different intraday timeframes and the daily charts as well. You might need to adjust the moving average lookback periods for specific timeframes, but I recommend initially sticking to the default settings.
- Complement it with price action support and resistance analysis.
If you are want to learn more about placing stops and targets for pullback setups like the Floor Trader System, read this article.
The article was first published on 13 April 2018 and updated on 5 January 2022.