Swing Trading with the Outside Bar Failure
By Galen Woods ‐ 8 min read
The outside bar (outside day) prompts intense emotions and traps confused traders. Use its failure for swing trading to profit from this bar pattern.
You have seen many Outside Bars as you scrutinize price action. So you know first-hand how it could smash the expectations of committed traders. But you might not be sure how to take advantage of this unique bar formation. If so, this method offers a solid option by focusing on the pattern’s failure.
Before we go through the trading approach, let’s recap what you need to know about this fascinating bar pattern.
What is an Outside Bar?
Imagine this as you observe the intraday price action shown in the chart below:
- The market falls and trades below the last trading session.
- The bears cheer, and the bulls lament.
- But, as the session unfolds, the market rises before their unbelieving eyes to close above the last trading session.
- Now, the bears are confused, and the bulls are confident.
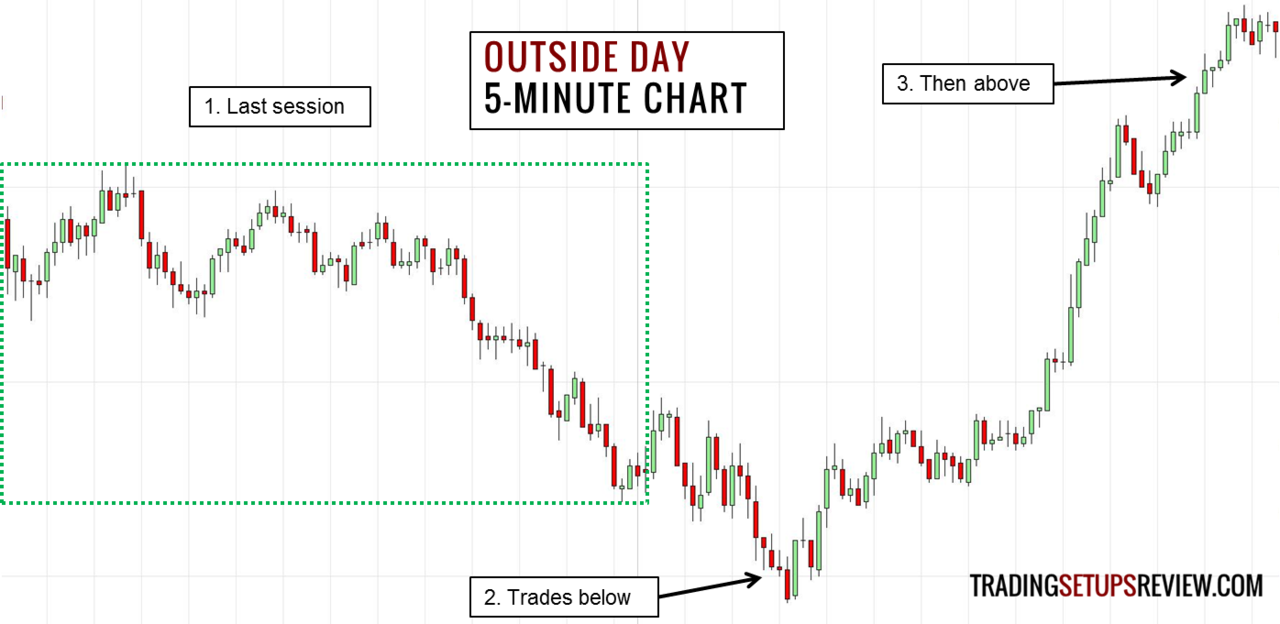
On a daily candlestick chart, the price action above will show up as an Outside Bar (or outside day).
By examining the price action within the pattern, we can better appreciate the market reaction it engenders.
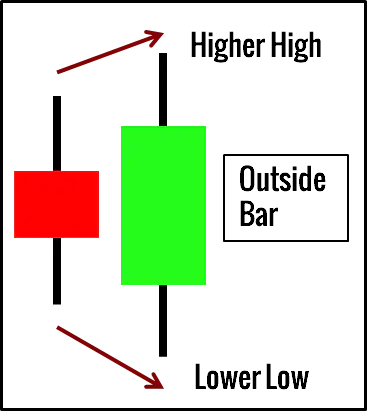
A Bullish Outside Bar Pattern
The figure below shows a bullish Outside Bar pattern.
It must contain the entire range of the bar preceding it. In pseudo-code:
- H0 > H1
- L0 < L1
An Outside Bar is emotional and erratic. It tests the extremes of market sentiments, prompting intense emotions from short-term traders.
In the bullish instance, the bears are sorely disappointed and enter into a state of shock as the market reverses up unexpectedly.
But, if you stay calm before the market tips its hand, you can exploit the chaos for profit. Chaotic.
- You will see bullish traders buying blindly as the market breaks out above a bullish Outside Bar.
- There will also be bearish traders selling as the market pushes below a bearish instance without thinking.
These are the traders we aim to trap with this swing trading setup.
Trading Rules - Outside Bar Failure
Our approach guns for trend pullbacks and will assume that counter-trend traders would be trapped.
Hence, we need a method to determine the market trend.
For simplicity, the rules below use the slope of a 20-period simple moving average (SMA) as a trend filter. This filter identifies relatively solid short-term trends.
Other trend filters can work too, and you should experiment with your preferred trend determination method.
Long Swing Trade
The chart below shows how to identify a long setup.
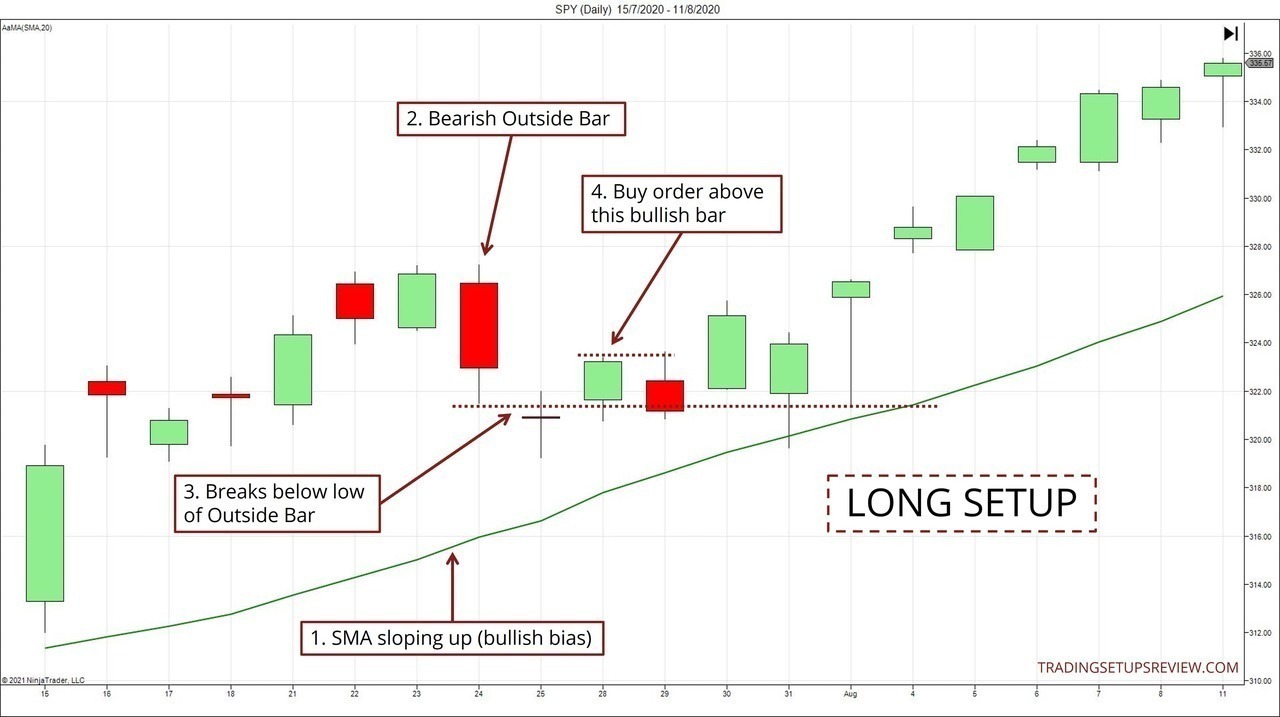
- The SMA is sloping upwards. (Bull trend)
- Wait for a bearish Outside Bar. (Pullback)
- The market breaks below the low of the Outside Bar. (Trap)
- Place a buy stop order above any bullish bar that follows. (Entry)
No bar high should be lower than the low of the bearish Outside Bar. If that happens, the setup becomes invalid.
Short Swing Trade
A short setup applies the same concepts in the opposite direction:
- The SMA is sloping downwards. (Bear trend)
- Wait for a bullish Outside Bar. (Pullback)
- The market breaks above the high of the Outside Bar. (Trap)
- Place a sell stop order below any bearish bar that follows. (Entry)
No bar low should be above the high of the bullish Outside Bar. If that happens, the setup becomes invalid.
Invalid Setup
It is essential to know when the setup is no longer valid.
The idea is that we are looking to trade the failure of the pattern. So if there are signs that the pattern has likely succeeded and would not fail, the failure setup becomes invalid.
The figure below shows a long setup that becomes invalid as the bearish Outside Bar managed to carry through with momentum.
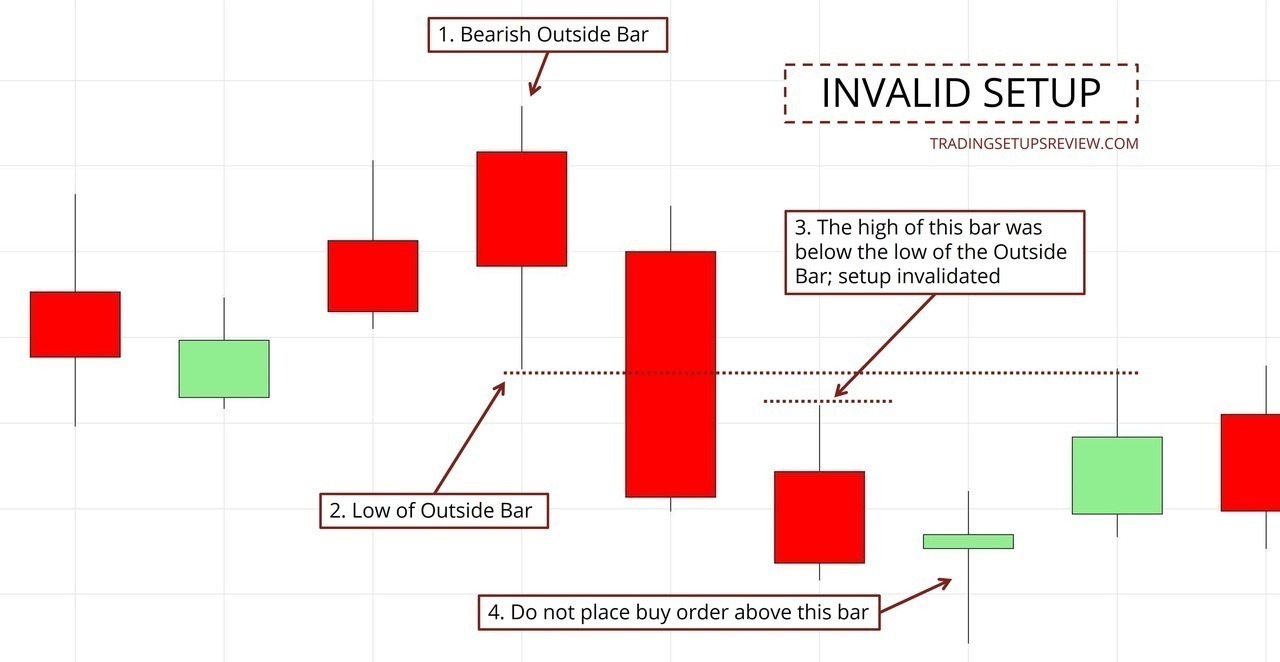
- This bearish Outside Bar might offer us a failure trade.
- This is the low of the Outside Bar. If a candlestick forms entirely below it, the failure setup is no longer valid.
- This bar formed entirely below the low of the Outside Bar. Hence, the setup becomes invalid.
- Accordingly, we do not place buy stop orders above subsequent bullish bars. We forgo this setup.
Swing Trading Examples - Outside Bar Failure
There are four examples here, including one losing trade for a balanced review.
Example #1: Winning Trade
The chart below shows the daily candlesticks of Sealed Air Corp (SEE on NYSE). The color of the SMA shows its direction.
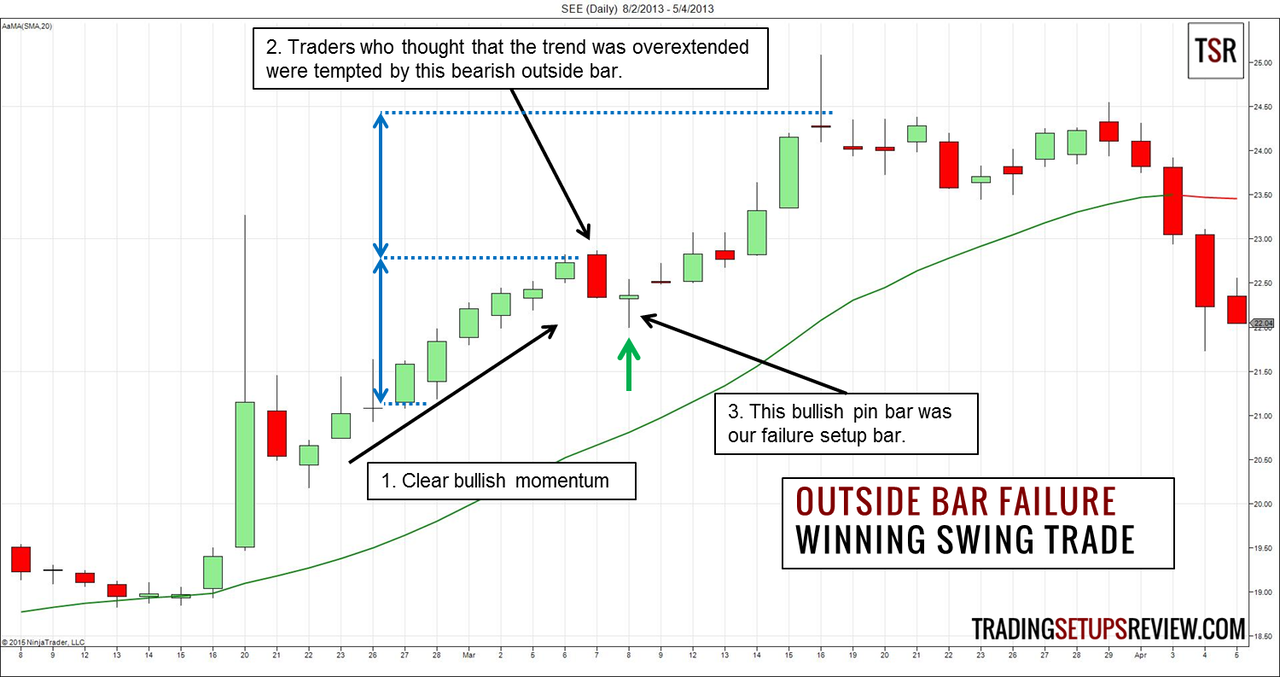
- The market sustained a bullish drift for over a week.
- This bearish Outside Bar formed at the end of a protracted upthrust. It drew in counter-trend traders who were betting on an overextended bull trend.
- However, the bears did not enjoy any follow-through. The bearish Outside Bar failed immediately with a bullish Pin Bar. Hence, this bullish Pin Bar presented an excellent failure setup.
The blue lines marked out a possible measured move target projected with the bull thrust leading up to our setup. Click here to learn other ways for taking profits.
However, there is a genuine concern for this setup: the Anchor Bar (11 bars before the bearish Outside Bar). The high of the Anchor Bar might act as a resistance, and conservative traders would consider that as a limit on the profit potential. In that case, the reward-to-risk ratio might not be ideal.
This drives home an often overlooked point. Even when price patterns are defined objectively, the context traders consider often makes a difference in how they approach the setup.
Example #2: Losing Trade
This is the daily candlestick chart of Entergy Corporation (ETR on NYSE).

- The down gap below the SMA kicked off the bearish market bias as the SMA sloped down.
- This bullish Outside Bar caught our interest as a potential failure trade setup. However, its exceptionally wide range and bullish close did not bode well for the young bear trend.
- The breakout above the Outside Bar met instant resistance, forming a bearish Reversal Bar that led us into a short trade. But unfortunately, the bearish setup failed as the market reversed upwards.
The outcome of this trade was undesirable, but it was not an absolutely bad setup. Let’s see why.
The good:
- The setup bar had resistance from the SMA and an area of congestion.
The bad:
- As the bear trend pushed to its extreme low, a bullish Pin Bar and a powerful bullish Outside Bar (also a Trend Bar) formed. These patterns called the persistence of the bear trend into question.
Overall, the form of the setup was fine, but the context was not ideal.
Example #3: Trend Line Support
This chart shows the daily candlesticks of Carnival Corp (CCL on NYSE).
This example shows how using a trend line channel can help analyze the context and take profits.
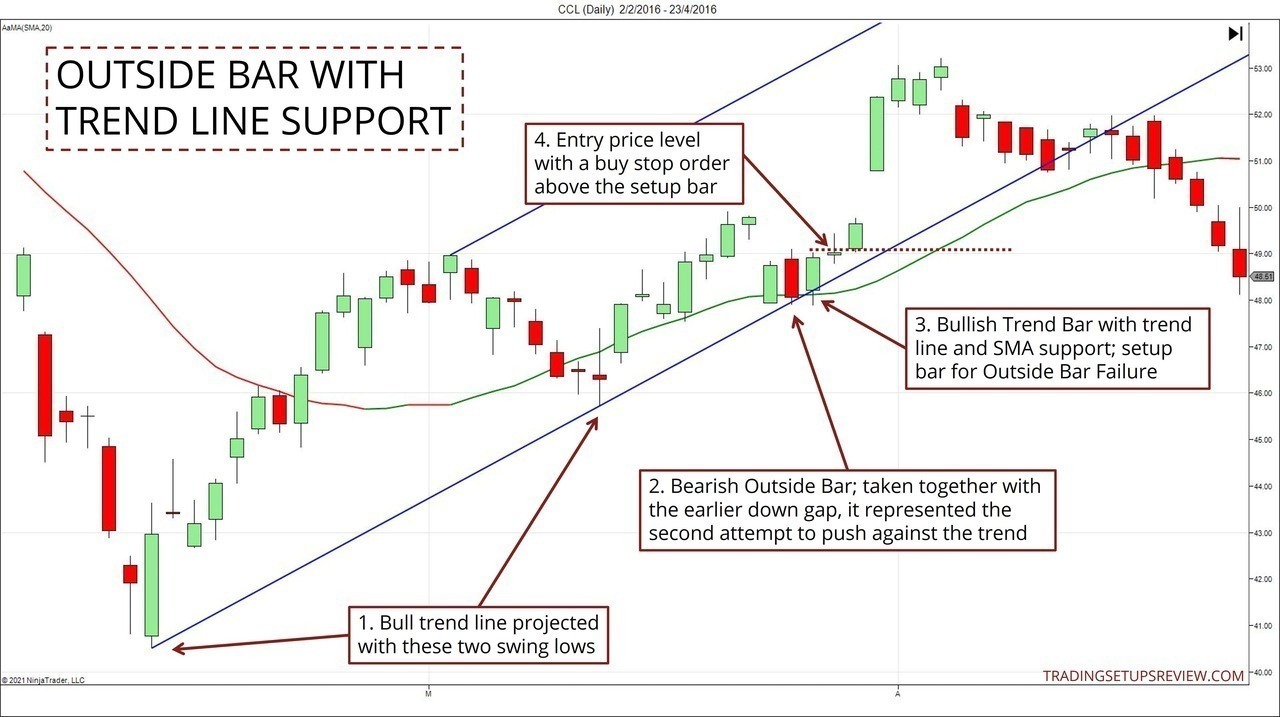
- These two swing lows form the basis of a bull trend line, which helped to confirm the bull trend in addition to the SMA.
- A bearish Outside Bar tested the trend line, which held up as a support. Also, notice the earlier gap down towards the SMA. Hence, the market had already made two attempts to push against the trend.
- The bullish Trend Bar that followed presented a failure setup. Moreover, this bar had the support of the bull trend line as well, making it a solid long setup bar.
- A buy stop order above the setup bar would be triggered at this price level.
The targeting options in this example are outstanding, so let’s examine them in greater detail here. The chart below shows the same price action as the one above, but with the relevant targeting mark-up.
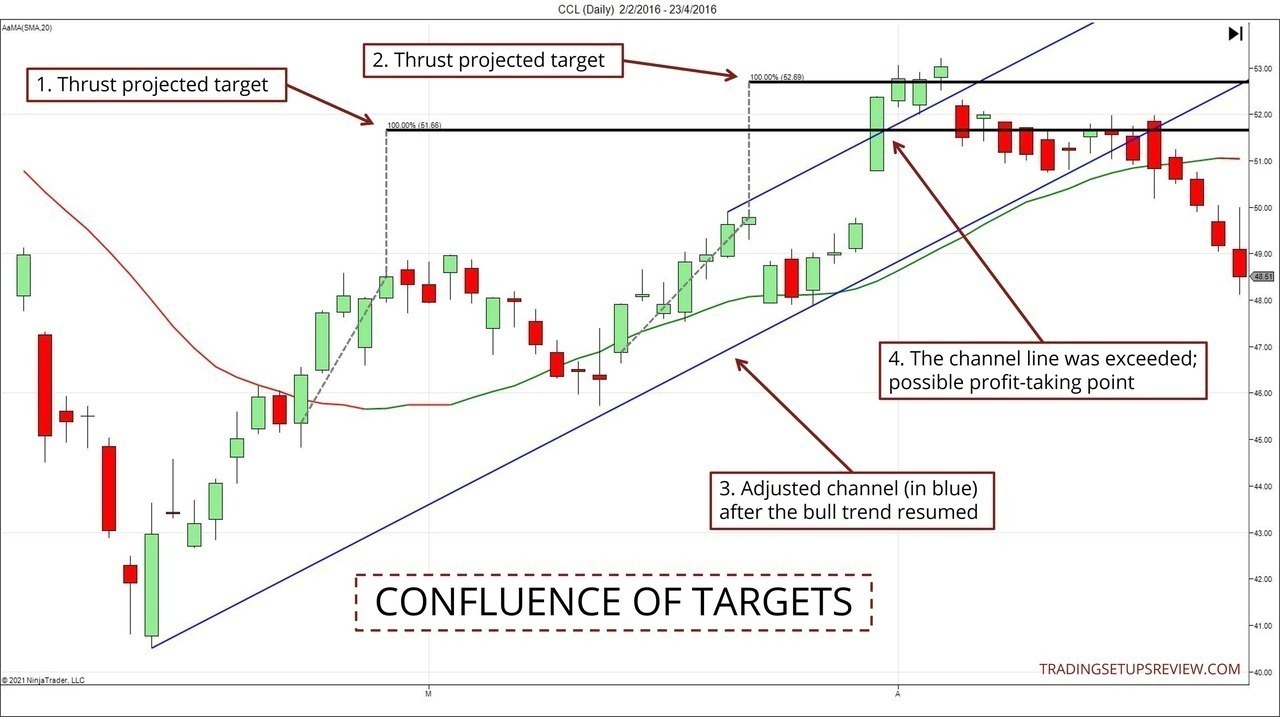
- With a streak of bullish bars, we can project an equidistant target from the top of the thrust. (This approach is discussed in Volume 4 of my price action course.)
- Another bullish thrust projected a target not far from the first projection. This confluence enhanced the reliability of both projected targets.
- After our Outside Bar Failure entry, we adjusted the channel as the trend resumed. This was the resulting channel (in blue).
- The channel line was exceeded at this point, right as the market punches into the zone formed by the two projected targets. Hence, it was an excellent point to take profits.
Example #4: Sideways Market
In the examples above, we looked for Outside Bar Failures in a trending market.
But this pattern is versatile, and you can look for it in a ranging market too. For example, patterns that trap breakout traders offer great breakout failure trades.
The chart below shows a few short Outside Bar Failures within a sideways market.
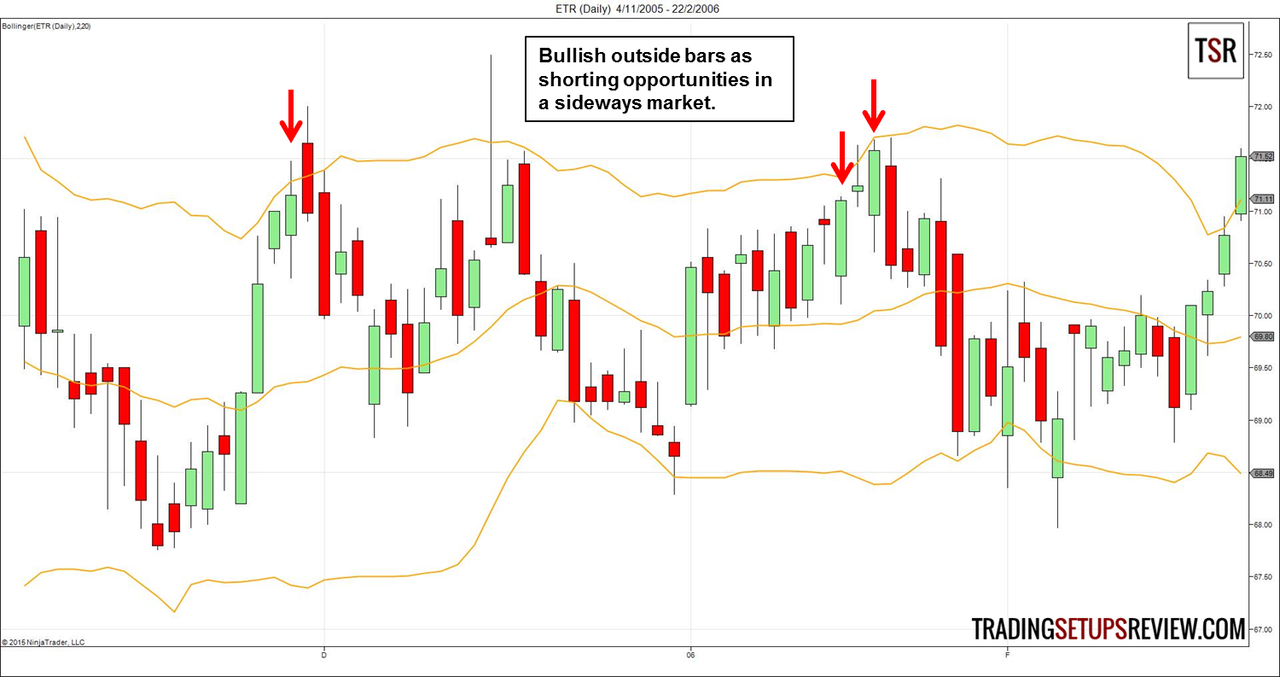
- For this approach, the opposite extreme of the Outside Bar is a safe scalper’s target. (Stop-loss placement can be tricky.)
- For a more ambitious target, aim for the nearby swing low.
Review - Outside Bar Failure
The best failure setups have the characteristics below.
- The Outside Bar is also a Trend Bar that closes against the SMA. The idea is that it must look convincing enough to draw in the counter-trend traders. (Most high-quality setups are also instances of the Trend Bar Failure pattern.)
- Yet, the bar range should not be extremely wide within the context of the trend.
Take a close look at the examples above.
- The Outside Bar in Example #1 barely reversed the bullish thrust before it.
- Whereas, in the losing Example #2, the Outside Bar almost reversed two weeks’ worth of price action.
Both Outside Bars looked strong in isolation. Yet, the price action context gave valuable hints as to which one was more likely to fail.
Don’t get trapped by the market. Instead, learn to profit from other traders’ failures using price action.
The article was first published on 20 January 2015 and updated on 29 July 2021.
Want to look for Outside Bar Failures on your charts right now?
Consider TradingView.* It offers a convenient way to launch powerful full-featured charts within your browser. I highly recommend it.
And we found a TradingView script by AleksanderThor that implements a version of the Outside Bar Failure so that you can play with this idea right away. While it’s not the exact implementation of what we discussed, it is based on the same concept and picks up similar setups.

![]()
*We are an affiliate of TradingView. They offer a free tier, but if you choose to sign up for their paid plans, we get a small commission to support this site.