How To Trade Continuation with Runaway Gaps
By Galen Woods ‐ 8 min read
Runaway gaps offer excellent entry points to join a powerful trend. Make use of its logical target and stop-loss points for a complete trading strategy.
Gaps represent prices that the market did not trade at. They are pockets of vacuum. For this reason, price gaps captivate traders. Hence, it is not surprising that there are various gap trading strategies. And more importantly, the trading strategy depends on the type of gap.

There are four major gap types:
- Exhaustion
- Runaway
- Breakaway
- Common
In this guide, we will focus on runaway gaps.
This gap type occurs in the middle of a trend, showing the urgency of the market to join the fast-moving trend.
Runaway gaps propel the trend. Hence, they offer fantastic opportunities to join the trend as it continues.
Beyond offering a chance to join a strong trend, runaway gaps have other features that are handy for traders. These features provide a fundamental approach to set both stop-losses and targets.
- First, if a runaway gap is valid, the trend will continue unambiguously. Hence, if the trade works out, the market should not fill the gap any time soon. This observation gives us a simple yet reliable method to set a stop-loss order - at the opposite end of the gap.
- Next, a runaway gap tends to form in the middle of a trend. This means that you can use the trending movement before the gap to project price targets. For this reason, a runaway gap is also known as a measuring gap.
Now, let’s encapsulate these concepts into practical guidelines for trading runaway gaps.
Trading Guidelines - Runaway Gaps
Runaway gaps zoom in on a specific type of continuation trade. This setup occurs in runaway markets which do not form significant retracements.
While most continuation trades begin with a pullback, the runaway gap gets us into a trend without a pullback or with a minimal one.
Gap trading is more of an art than a science. So treat the following pointers as guidelines rather than mechanical rules.
Bullish Runaway Gap
- Sharp rising price action in a bull trend followed by a gap.
- A lack of pullback trade opportunities. (Indicating urgency)
- Gap forms with increased volume. (But avoid exceptionally high volume that might point to an exhaustion gap.)
- Buy on close of the gap day.
Position Management
- Place an initial stop-loss at the low of the gap.
- Use the magnitude of the trend before the gap to project a target upwards. (The first example below shows how.)
Bearish Runaway Gap
- Sharp falling price action in a bear trend followed by a gap.
- A lack of pullback trade opportunities. (Indicating urgency)
- Gap forms with increased volume. (But avoid extremely high volume that might point to an exhaustion gap.)
- Sell on close of the gap day.
Position Management
- Place an initial stop-loss at the high of the gap.
- Use the magnitude of the trend before the gap to project a target downwards.
Trading Examples - Runaway Gaps
In the charts below, I have applied a few useful indicators and markers.
20 Period EMA (orange line)
The EMA helps to highlight sharp price movements that are ideal precursors of runaway gaps. Specifically, we want to see price action staying a distance away from the moving average for consecutive bars.
Gap Marker (blue shaded boxes)
Some gaps are hard to spot visually when the price chart is zoomed out. Hence, I’ve applied a custom indicator to highlight the price gaps (or windows as candlestick traders call them).
Volume Panel with Upper Bollinger Band (brown line)
On the volume plot below each candlestick chart, the brown line represents a threshold we can use to spot volume spikes. Runaway gaps _should not _form with volume spikes.
Example #1: SNAP Daily
This example shows how we can use a runaway gap for determining both entry and exit points.
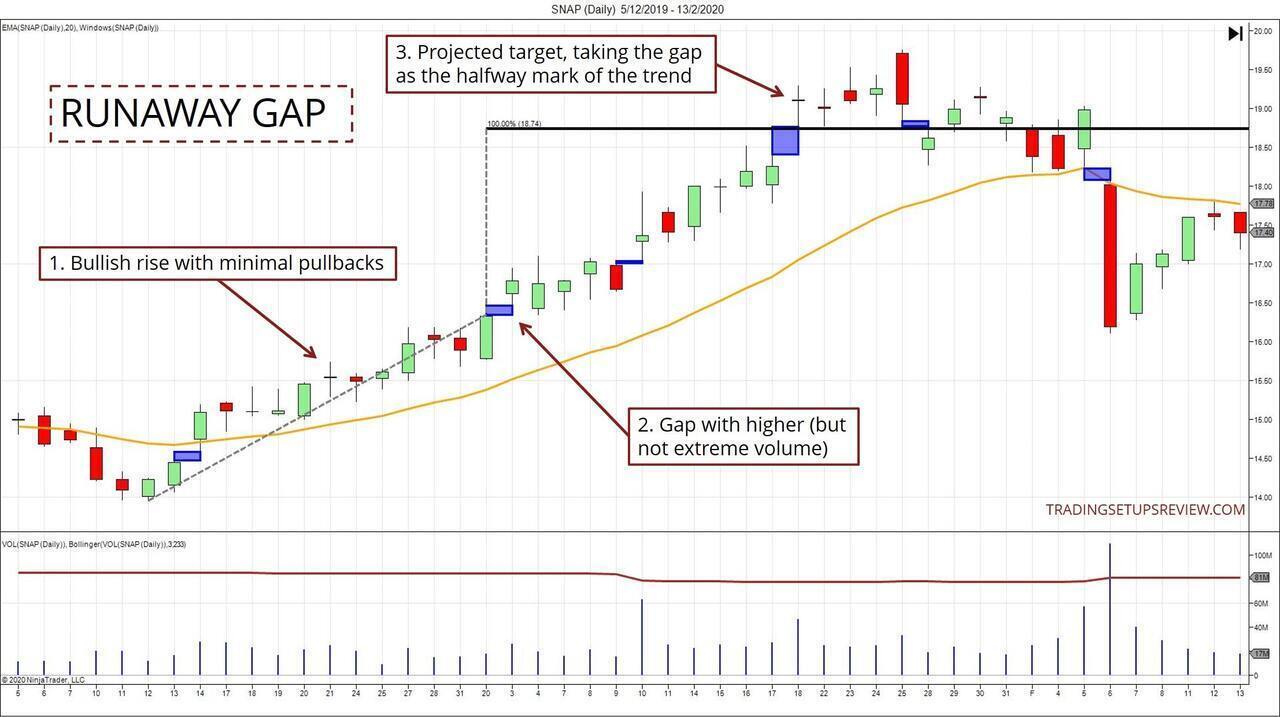
- For this method, the critical price action feature to look for is a bullish rise with minimal pullbacks.
- This gap piqued our interest as it formed with slightly higher (but not extreme) volume.
- Taking the gap as a possible mid-point of the trend, we projected a target level. In this case, the target worked well and captured most of the profit potential.
Example #2: JPM Daily
This example is similar to the previous one and serves to drive home the basic trading approach for runaway gaps.
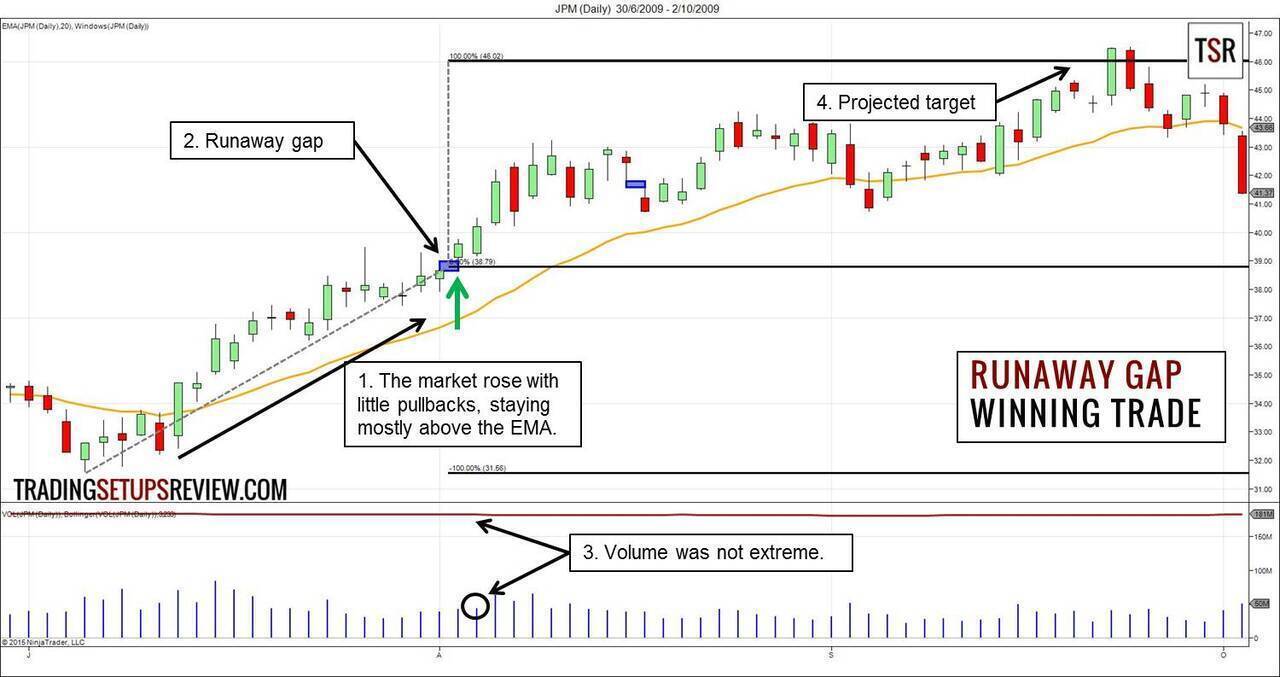
- The market trended upwards with only minor pullbacks. Since the market crossed above the EMA, the price action has remained above it.
- This gap was not a huge one. However, as it occurred right after decisive bullish action, it might be a runaway gap.
- The gap volume was not high. (Far below the Upper Bollinger Band line)
- The market continued rising with channel-like price action. It took a while, but the trade ran its course and hit the projected target.
Observe that despite the deeper retracements after the gap, the market did not come close to testing the gap.
Example #3: Losing Trade
For a balanced discussion, let’s review a runaway gap trade that did not turn out as well.
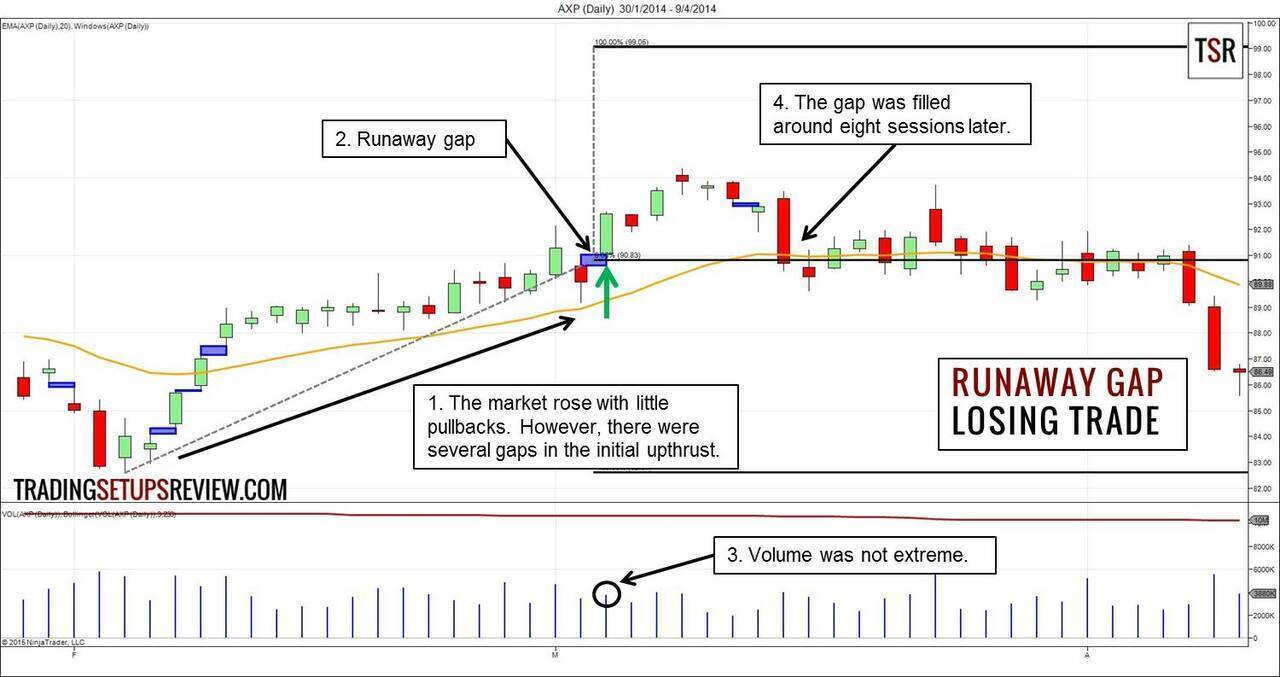
- The market rose sharply above the EMA and hovered above it.
- After the bullish price action, a gap formed near the high of the bull trend.
- The gap volume increased a little but was not a volume spike.
- The market failed to reach our projected target. Instead, the gap was filled within eight trading sessions.
The urgency (of the bulls) is more apparent in Example #2, in which the market rose without much sideways action.
In contrast, here, the market went sideways for around two weeks before resuming its way up. For runaway gaps, a sense of urgency is an essential precursor to success.
Example #4: Consider The Market Structure
In this example, we consider a recent volume spike that presented a potential resistance zone.
Factoring in the market structure of support and resistance offers a way to increase our confidence in the setup.
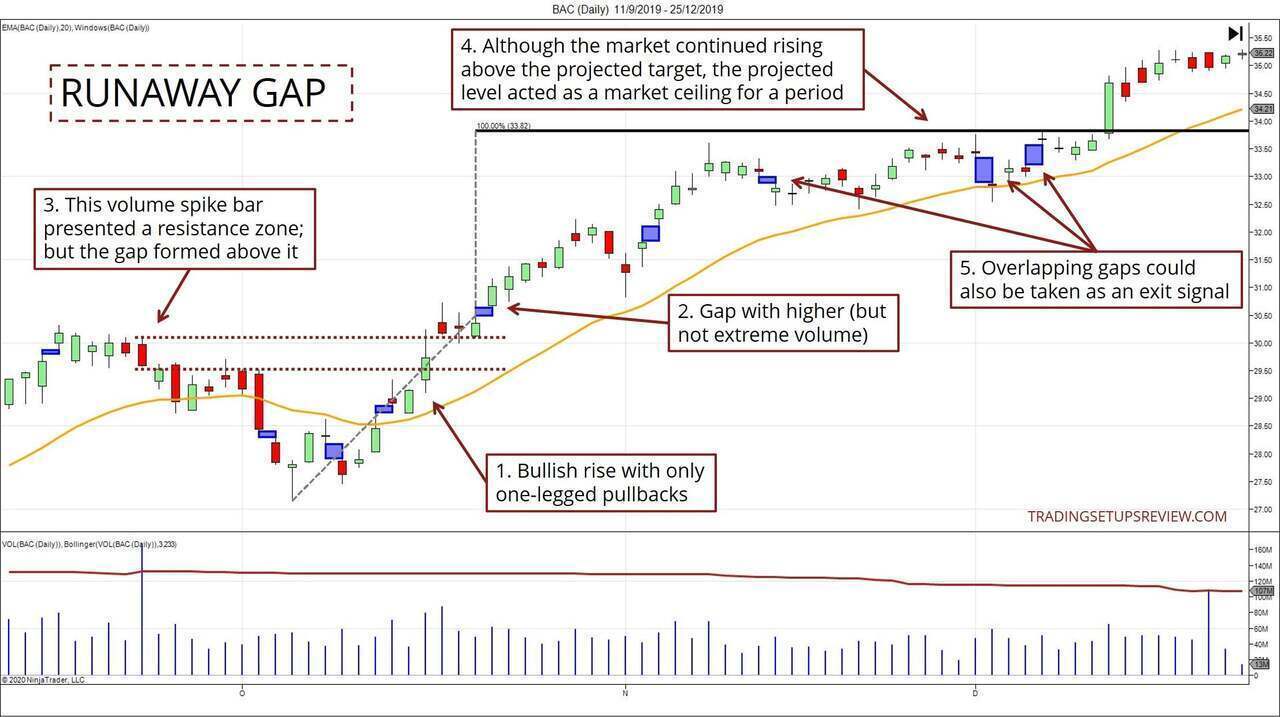
- This bullish rise was ideal for spotting runaway gaps as it saw only one-legged pullbacks. Moreover, the retracements were relatively shallow.
- This gap formed with slightly higher volume compared to the previous bar.
- An earlier volume spike formed a potential resistance zone overhead. However, the runaway gap formed clearly above the resistance, implying that the market had overcome the supply at that level.
- Unlike the first two examples, the market continued rising beyond the projected target. Nonetheless, we observed that the projected level had the effect of a resistance level. The market went sideways for a period before busting above it.
- Look for overlapping gaps like these. Consecutive gaps tend to overlap when the trend loses steam. Hence, they might offer a nimbler way to exit a profitable trade.
Example #5: Runaway or Exhaustion
What is common between runaway and exhaustion gaps?
A market trend precedes both gap types.
A runaway gap continues a trend, while an exhaustion gap reverses it. Since the context of both gaps are the same, how do we distinguish them?
Volume analysis offers an important clue.
Many traders look for runaway gaps with increased volume as a sign of market interest. Some of them think that the higher the volume, the better the quality of the gap setup.
However, when a gap forms with a substantial volume spike, the probability that it is an exhaustion gap goes up dramatically. Thus, our runaway guidelines avoid gaps with exceptionally high volume.
This example shows a gap that looked like a potential runaway gap. However, observing its extreme volume, we were able to sidestep a period of sideways price action.
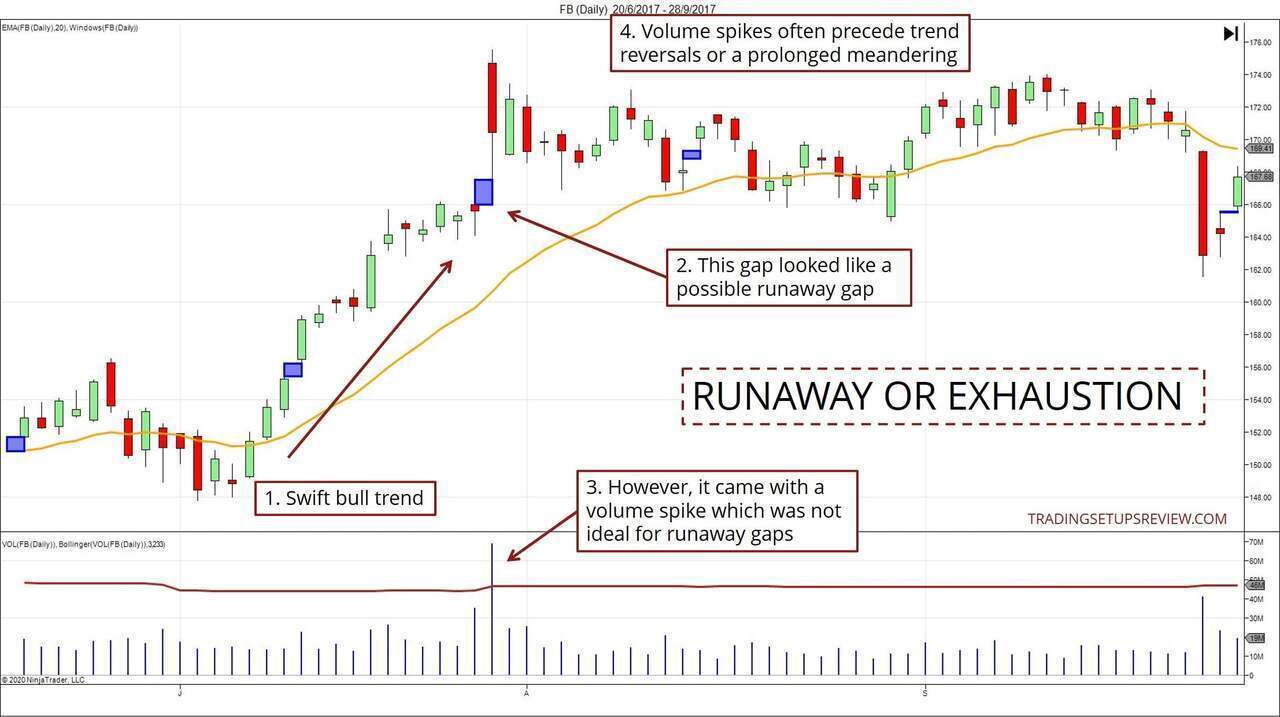
- The market rose quickly with minimal pullbacks. It had the perfect context for spotting a runaway gap.
- Hence, when this gap formed, it was a candidate for a runaway gap setup.
- However, this gap formed with a volume spike. (How I define volume spikes)
- After a volume spike, the market often reverses or goes into a meandering mode. The latter was confirmed in this example.
After the prolonged sideways action shown on the right half of the chart, the market did resume the bullish trend.
However, the gap we examined was not a runaway gap.
After a runaway gap, a trend should continue with strong momentum. But here, instead of continuing the trend, the market tested the gap and eventually filled the void.
Review - Runaway Gaps
Swing traders cannot avoid dealing with price gaps.
While gaps present risk that requires mitigation, they are also profit opportunities.
Runaway gaps are ideal for gap traders for the following reasons:
- They are, by definition, on the side of the market trend. Trading exhaustion gaps goes against the trend; trading runaway gaps goes with the trend.
- Runaway gaps also offer price objectives for logical profit-taking. But don’t use the projected target without observing the market structure. Significant support or resistance might cause the market to stall before hitting the target. In such cases, target with caution and flexibility.
- A runaway gap seldom fills before reaching its target. Use this knowledge to guide your stop placement. For a bullish runaway gap, place your stop-loss just below the gap. For a bearish gap, place your stop-loss just above the gap.
As emphasized in the examples above, market urgency is the key to profitable runaway gaps. The fear of missing out on the trend should be evident from the momentum and strength of the trend before the gap.
Whenever you encounter a gap, correctly classifying it is crucial to forming a viable trading strategy.
However, no trader can classify gaps without error. Thus, it’s preferable to combine gaps typology with other tools for better results.
If you want to learn more about other types of gaps, and how to spot them, check out these following resources:
- Breakaway Gaps [Guide]
- Exhaustion Gaps [Guide]

[Book]
The article was first published on 19 June 2015 and updated on 2 October 2020.