Anchor Zones Trading Strategy
By Galen Woods ‐ 5 min read
Find extremely reliable support and resistance areas with the anchor zones trading strategy, which focuses on extreme price activities.
L. A. Little wrote two excellent books on trend trading. In his books, he explained a key timing concept called anchor zones, which is a very useful tool for price action traders.
In our review, we will find anchor zones and design a trading strategy around them. However, bear in mind that anchor zones are just a part of L. A. Little’s trading framework. To apply anchor zones in L. A. Little’s trend framework. you must refer to his books.
- Trend Trading Set-Ups: Entering and Exiting Trends for Maximum Profit (Wiley Trading)
- Trend Qualification and Trading: Techniques To Identify the Best Trends to Trade (Wiley Trading)


What are Anchor Zones?
To mark out anchor zones, we must first find anchor bars. Anchor bars have one or more of the following signs of extreme price activity:
- Wide range
- Gaps
- High volume
Once you find the anchors bars, you can draw the anchor zones by marking the limits of the bars.
The NinjaTrader chart below shows how to do it.
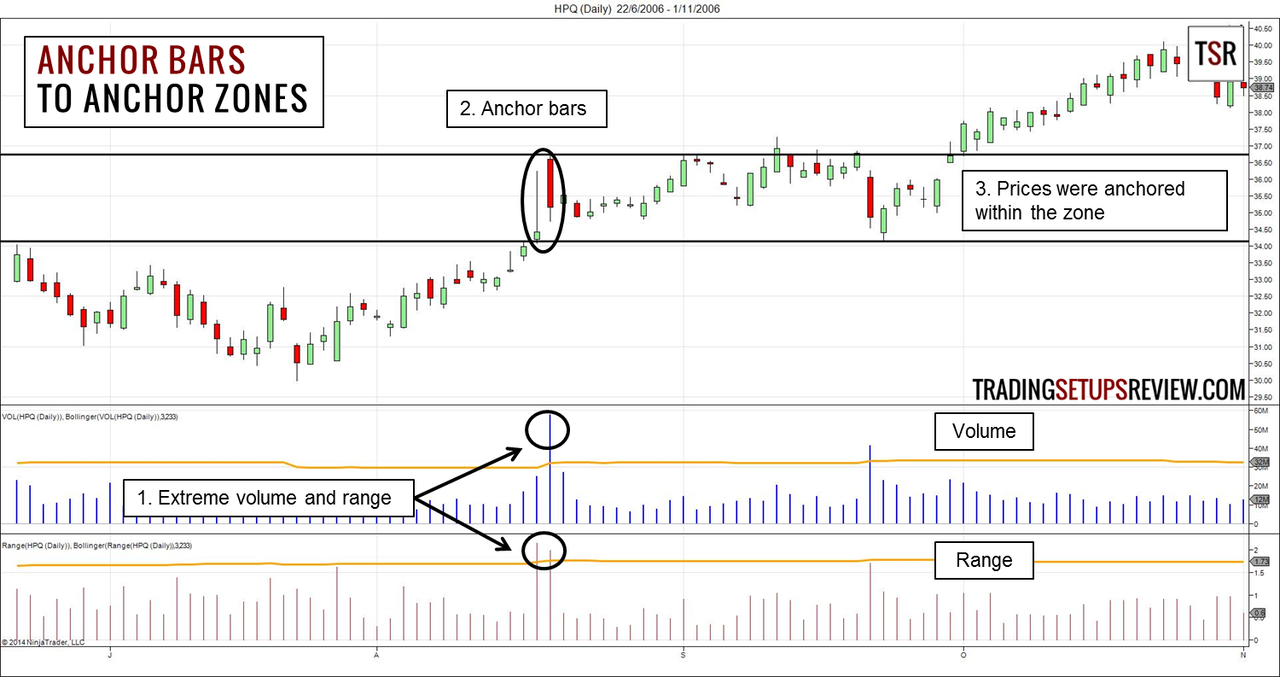
The steps are simple.
- Find bars with extreme volume, range, or gaps.
- The second middle panel shows the volume of each bar. The orange line is the Upper Band Line of a Bollinger Band applied to volume, used to identify volume spikes.
- The lowest panel shows the range of each bar. The orange line is the Upper Band Line of a Bollinger Band applied to range, used to identify wide range bars.
- These are the anchors bars.
- Draw zones along the limits of the anchor bars and expect price to stay within the zone.
For the examples below, we marked out the anchor zones using the same method.
For TradingView users
If you are using TradingView, you can copy this chart layout to study Anchor Zones in your account.
To make sure that the chart layout can be used by traders who are using a free TradingView account, we had to change the implementation so the TradingView chart differs from the other charts in this article. Nonetheless, they are looking for the same Anchor Bars.

- In the upper panel, it uses my Volume Spikes study to highlight the extreme volume bars.
- In the lower panel, with the Average Daily Range (ADR) plot, it highlights wide range bars.
Trading Rules - Anchor Zones
The trading approach is simple and essentially involves observing price action as the market tests the anchor zone.
Long Trading Setup
- A bullish reversal bar that tests the support anchor zone
- Buy on break of high of reversal bar
Short Trading Setup
- A bearish reversal bar that tests the resistance anchor zone
- Sell on break of low of reversal bar
Anchor Zones Trading Examples
Winning Trade - Bullish Trade
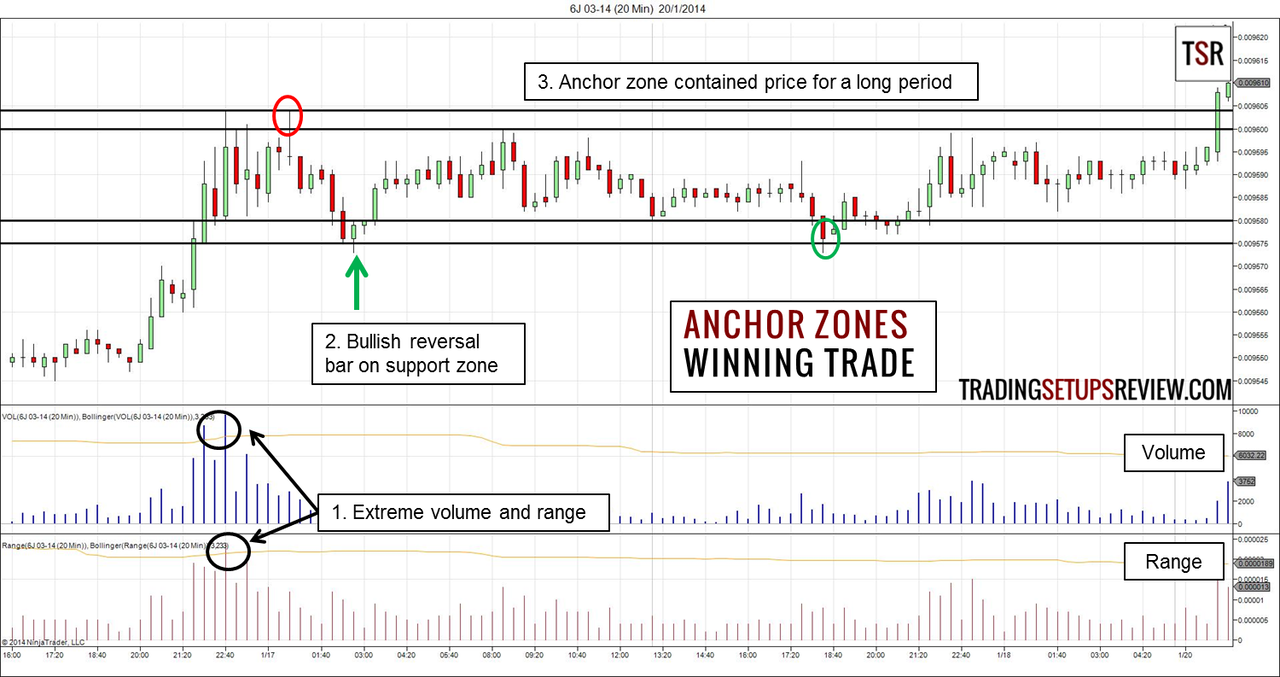
The examples in L. A. Little’s books are mostly from the stock market and in the daily time-frame. However, in this trade, we used the anchor zones method on a 20-minute chart of the 6J futures on CME.
- The extreme range and volume highlighted the anchors bars which guided us to mark out the support and resistance zones.
- The bullish reversal bar that poked slightly below the anchor support zone is our trading signal. We placed a buy stop order on its high. Prices rose and stopped just short of the resistance zone, giving us a enough room for profit.
- This anchor zone was very successful in containing the price movement. The red and green circles highlight other potential anchor zone trades.
Losing Trade - Bullish Trade
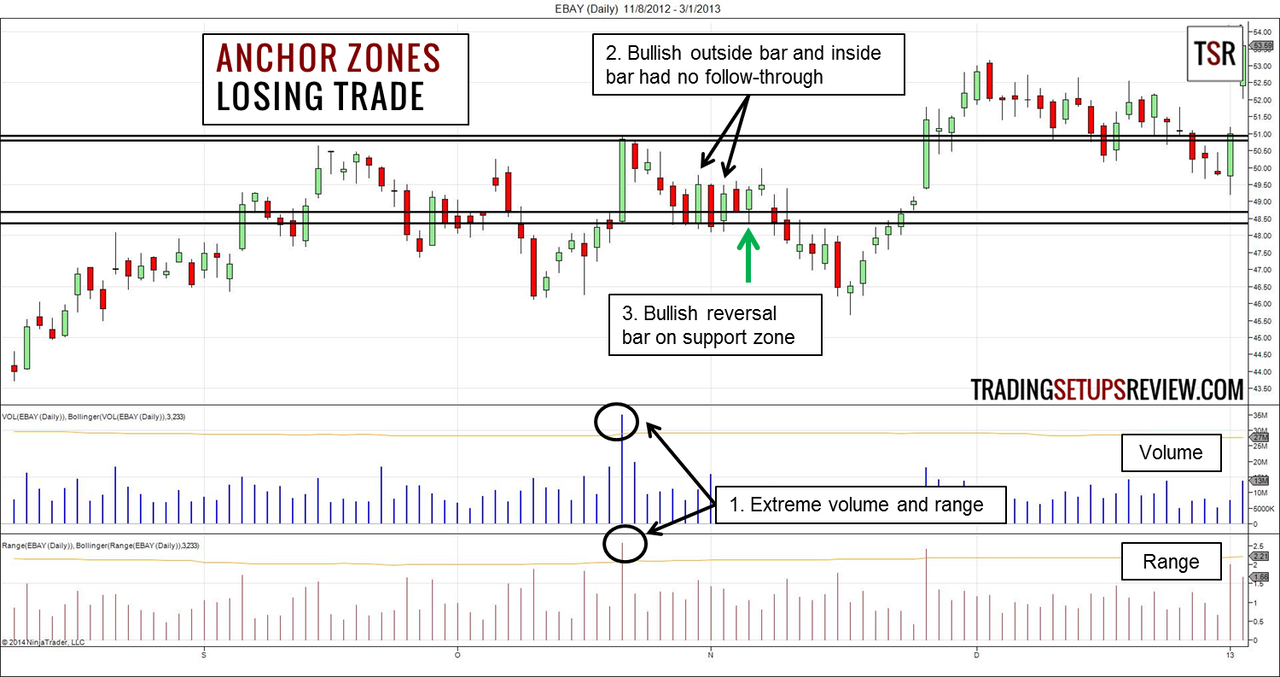
This is a daily chart of EBAY. It shows anchor zones that provided some support and resistance but did not lead to a profitable trade.
- Taking our cue from the volume and range plots, we marked out the anchor zones.
- Prices fell quickly to the support zone. It held up with a bullish outside bar and inside bar. However, neither bullish patterns had follow-through.
- Finally, a bullish reversal bar formed on the support zone, and we bought as price broke above it. However, the trade failed swiftly as price fell through the anchor zone to test an earlier swing low.
Review - Anchor Zones Trading Strategy
Price action often exhaust themselves with climatic moves. Anchors bars include gaps, wide range, and high volume. These are also signs of climatic moves. Hence, anchor bars are exhaustive moves.
Marking out support and resistance zones with anchor bars is a superb trading method. It integrates price and volume to find key price ranges that work well to contain prices.
This concept of anchoring prices with exhaustive moves also work in day trading. The high and/or low of the each trading session is often formed within the first trading hour. The first hour of the trading day usually has wide range and high volume. Hence, it serves as an anchor for the rest of the trading session. Morning reversal trades and opening range break-out trades work on the same premise.
Our trading rules focus on reversal bars as entry signals for simplicity. In fact, you can look out for any candlestick pattern to time the trade.
More experienced traders can even enter with limit orders slightly beyond the anchor zones. Using limit orders will result in minimal adverse price movement in successful trades. The stop-loss is tight and the reward to risk ratio is excellent. However, you must have ironclad discipline to exit without hesitation.
Read: Trading Ranges with Gimmee Bars
If you find this anchor zone concept effective, you should see how it works with L. A. Little’s trading framework in his highly reviewed books.